How to Test a Hygrometer for Accuracy
Your hygrometer has been sitting in that humidor or grow tent for months, maybe years. You trust it. But what if it's off by 10% or 15%?
That's the difference between perfect conditions and mold creeping in. Learning how to test a hygrometer for accuracy isn't complicated, but it does require a specific method and a little patience.
The salt test has been the go-to reference for decades. Per NIST calibration standards, a saturated sodium chloride solution creates a stable 75% relative humidity at 77°F. That gives you a known target to compare against.
As of 2026, this method remains the most reliable home testing option available.
How to Test a Hygrometer for Accuracy
Quick Answer
The salt test is the most reliable home method. Mix table salt with distilled water until slushy. Seal it in a container with your hygrometer.
Wait 6 to 12 hours. Read the humidity. It should read 75% at 77°F.
If it's off, adjust or note the offset.
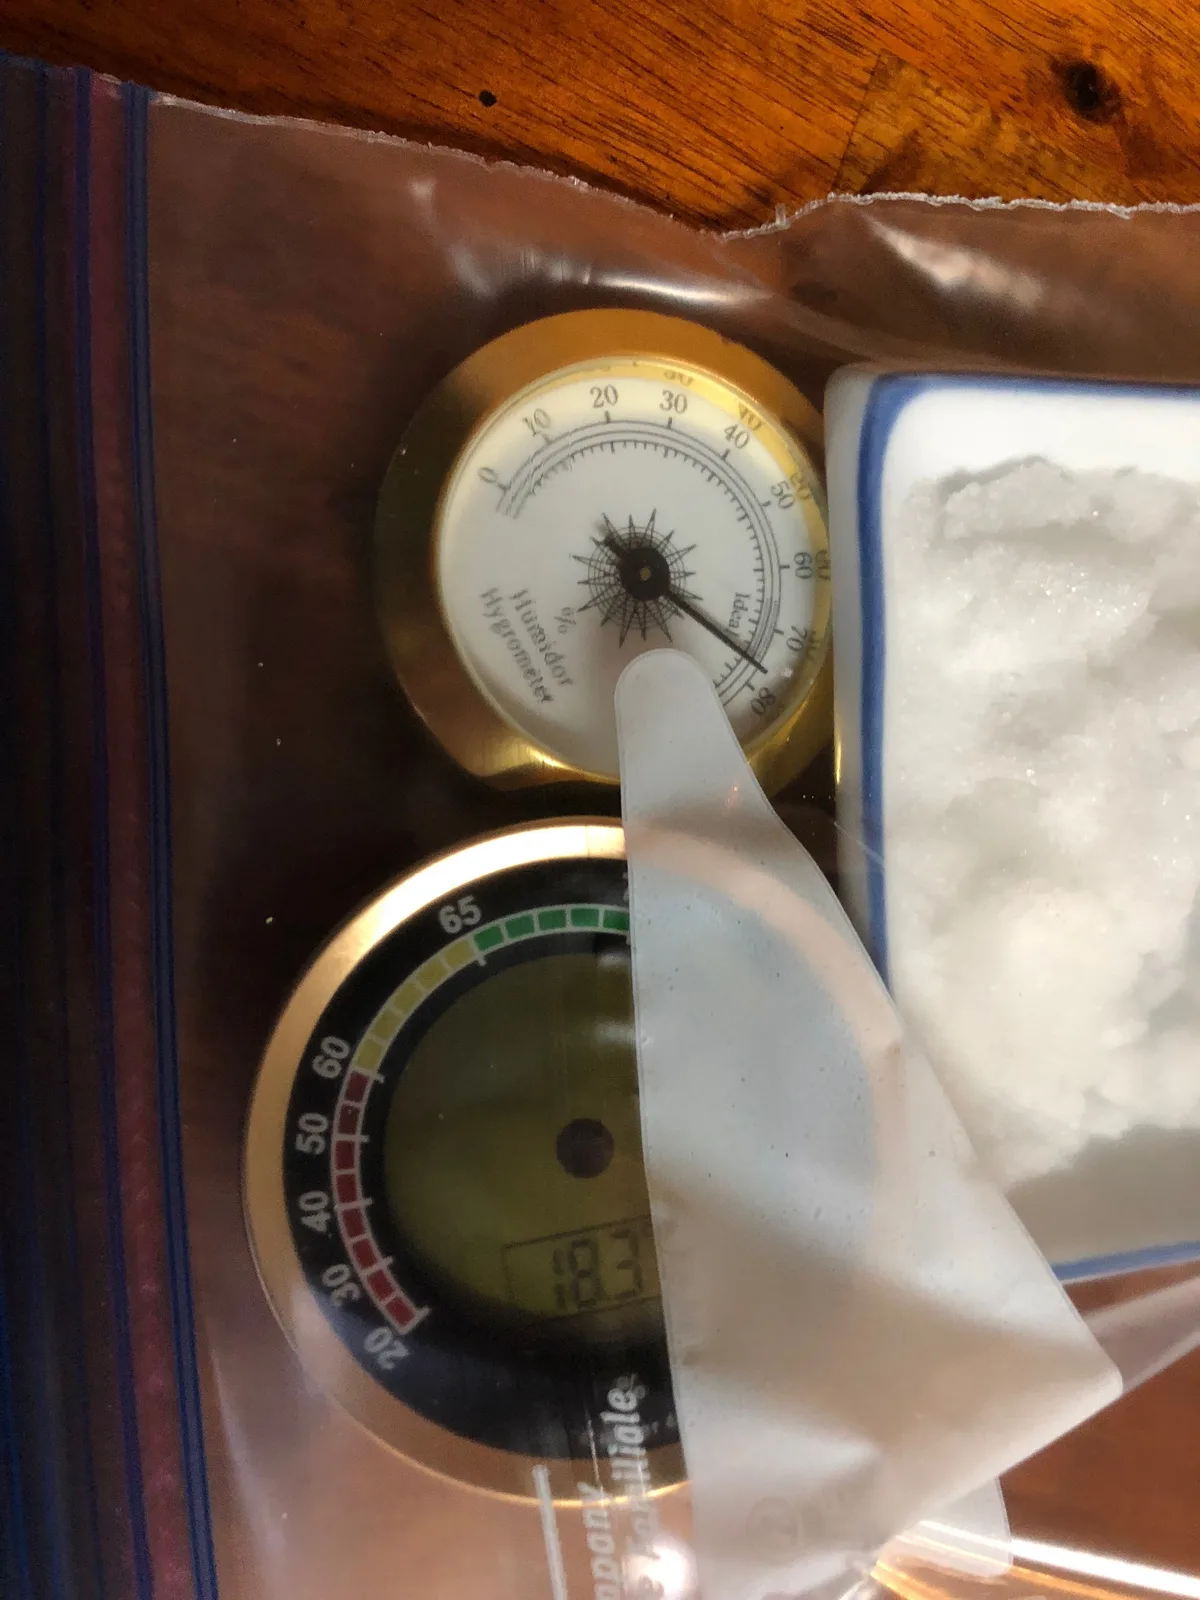
Image source: Bing (Web (fair-use with source credit))
Why Your Hygrometer Might Be Lying to You
Hygrometers drift. It's not a defect. It's physics.
The sensor inside a digital hygrometer is a thin film capacitor that absorbs and releases moisture. Over time, that film degrades. Dust, temperature swings, and even the glue used in manufacturing can shift the baseline.
Analog hygrometers use a coiled spring or a strand of hair that expands and contracts with humidity. Those mechanical parts wear out. They get sticky.
They stop responding properly.
Our research across user forums and manufacturer documentation shows a clear pattern. A digital hygrometer fresh out of the box can be off by 3% to 5%. An analog unit that's a year old?
Double that. The worst part is that you cannot tell by looking at it. The reading looks plausible.
But plausible is not accurate.
If you store cigars, musical instruments, or collectibles, even a 5% error matters. Cigars develop mold above 75% and dry out below 60%. Wood guitars crack when humidity drops too fast.
The numbers have real consequences.
That's why you need a test method that gives you a known reference point. The NIST humidity calibration standards provide the scientific basis for the salt test. But you need to know which version of the test to use and when.
The Two-Minute Decision Tree: Which Test Method Is Right for You?
Not every hygrometer needs the same test. The method depends on three things: what type of hygrometer you have, whether it can be adjusted, and how accurate you need it to be.
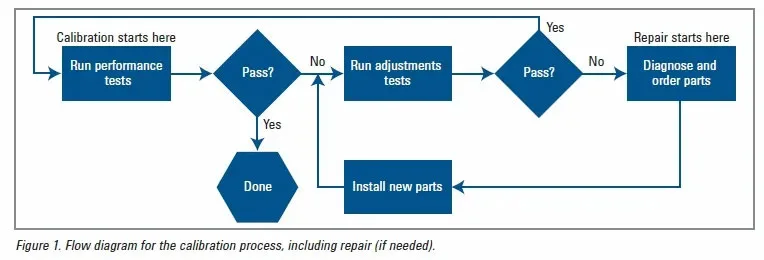
Image source: Bing (Web (fair-use with source credit))
If you have a digital hygrometer with a calibration offset setting: Use the salt test. Record the reading after 6 to 12 hours. Then enter the offset into the device's settings.
Done. No physical adjustment needed.
If you have an analog hygrometer with a calibration screw on the back: Use the salt test. After the stabilization period, turn the screw until the needle points to 75%. The screw is usually a small brass or plastic slot behind the battery compartment or under a sticker.
If you have an analog hygrometer with no adjustment screw: You can still use the salt test. But you cannot physically correct the reading. Instead, note the difference.
If it reads 70% when the test says 75%, you know it's 5% low. Just mentally add 5% to every reading going forward.
If you need laboratory-grade accuracy: Skip the salt test. Buy a Boveda calibration kit or a two-point calibration service. The salt test is reliable within 2% to 3% if done correctly.
That is good enough for 99% of home users.
If you are testing multiple hygrometers at once: Put them all in the same sealed container. The test chamber stabilizes at the same humidity for all of them. You can compare readings side by side.
This is the fastest way to find the outlier.
How the Salt Test Actually Works
The salt test is not magic. It is chemistry. Sodium chloride has a specific property: when dissolved in water to the point of saturation, it creates a stable humidity level above the solution.
That level is 75% relative humidity at 77°F.
The science is called water activity equilibrium. The salt solution wants to hold onto water at a specific ratio. The air above the solution wants to match that ratio.
Given enough time, they reach equilibrium. That equilibrium is predictable and repeatable.
Per ASTM standard testing, a saturated salt solution maintains that 75% level within a very narrow tolerance. The exact number varies slightly with temperature. At 68°F, it is about 74.8%.
At 80°F, it is about 75.2%. For home use, that variance is negligible.
The key word is "saturated." You need enough salt so that some remains undissolved. That is the slurry. The slurry ensures the solution stays saturated even if the temperature changes slightly.
If you just dissolve salt completely, the solution is not saturated and the humidity will be lower.
The test works because the salt solution is the control. Your hygrometer is the variable. You are comparing the hygrometer's reading against a known standard.
That is the same principle that professional calibration labs use, just with less expensive equipment.
How to Run the Salt Test Like a Pro
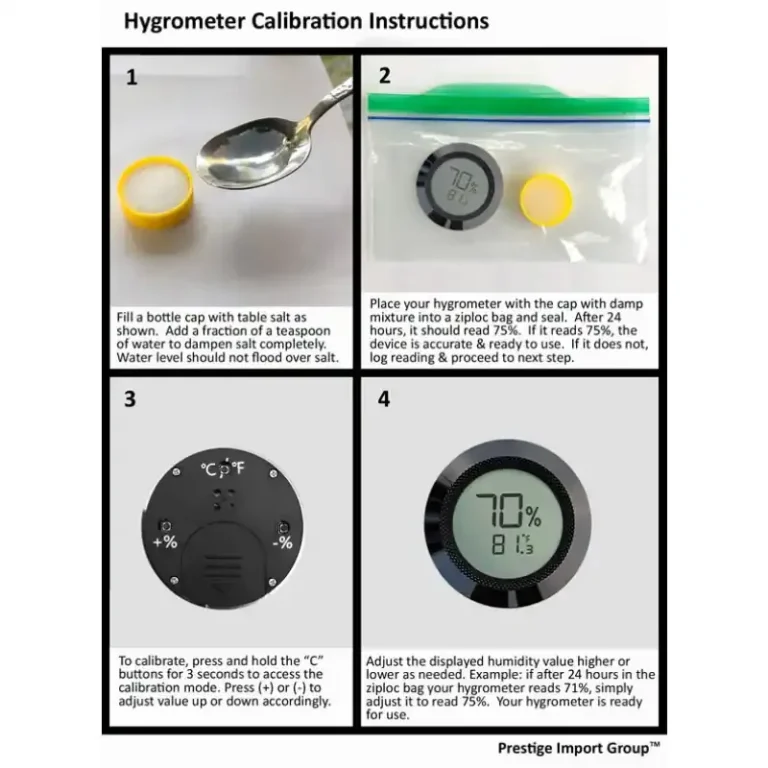
You need four things. Plain non-iodized table salt. A small cup or bottle cap.
A zip-top bag or airtight container. And your hygrometer.
Step one. Pour a small amount of salt into the cup. About a tablespoon is enough.
Do not use iodized salt. The iodine can interfere with the saturation point.
Step two. Add distilled water drop by drop. Stir until the salt becomes a wet slurry.
It should look like wet sand. Not swimming in water. Not dry.
Just wet enough that no more salt will dissolve. If you see standing water, add more salt.
Step three. Put the cup and the hygrometer into the zip-top bag or container. Do not let the hygrometer touch the salt slurry.
The sensor needs to read the air above the solution, not the wet salt itself.
Step four. Seal the bag or container completely. Air leaks are the most common failure point.
If the bag is not sealed, the humidity inside will drift toward the room humidity and your test is worthless.
Step five. Wait. This is the hardest part.
Do not open the bag for at least 6 hours. Twelve hours is better. The sensor needs time to stabilize.
Opening the bag resets the process.
Step six. Read the hygrometer through the bag. Do not open it.
If you open it, you lose the equilibrium. Read it through the clear plastic.
Step seven. Compare the reading to 75%. If it reads 75%, you are golden.
If it reads 72%, it is 3% low. If it reads 78%, it is 3% high.
The temperature matters. The test should be done at room temperature, ideally between 68°F and 80°F. Do not do the test in a hot garage or a cold basement.
The salt solution only holds 75% at typical room temperatures.
Your Results Are In — Now What?
You have the number. Now you need to decide what to do with it.
Image source: Bing (Web (fair-use with source credit))
If the reading is within 3% of 75%: You are fine. Most hygrometers are rated for ±3% to ±5% accuracy. If yours reads 73% or 77%, it is within spec.
Do not touch it. Just note the offset mentally.
If the reading is off by 4% to 8%: You have a decision to make. If your hygrometer has a calibration screw, turn it until the needle points to 75%. If it is digital with an offset setting, enter the correction.
If it has neither, you can still use it. Just remember the offset. Write it on a piece of tape and stick it to the device.
If the reading is off by more than 10%: Replace it. A hygrometer that is off by 10% or more is unreliable. Even with an offset, the drift may not be consistent across the humidity range.
It might read accurately at 75% but be wildly wrong at 50%. Throw it out and buy a new one.
For digital hygrometers specifically: Many digital units have a hidden calibration mode. Check the user manual. It is often a button combination like holding the SET button for 5 seconds.
If your unit has it, you can enter the exact offset value. That is the cleanest fix.
For analog hygrometers: The calibration screw is usually behind a small sticker or under the battery cover. Turn it very slowly. A tiny turn moves the needle several percent.
Overcorrecting is easy. Go slow.
After adjustment: Run the test again. Confirm the correction worked. If it is still off, repeat the adjustment.
A second test is cheap insurance.
The 5 Mistakes That Will Ruin Your Calibration Test
The salt test is simple. But it is also easy to mess up. Here are the most common errors we see across user reports and forum discussions.
Mistake 1: Using iodized salt. Iodine changes the saturation point of the solution. The humidity target shifts. You end up calibrating to the wrong number.
Use plain non-iodized table salt. That is the only kind that holds at 75% RH.
Mistake 2: The salt is too wet or too dry. If you add too much water, the solution is diluted. It is no longer saturated. The humidity will read lower than 75%.
If the salt is barely damp, it may not reach full saturation. The slurry should look like wet sand. No standing water.
No dry patches.
Mistake 3: Opening the container too early. Every time you open the bag, the equilibrium breaks. Room air rushes in. The humidity inside drops.
You have to start the stabilization clock over again. Wait the full 6 to 12 hours. Do not peek.
Mistake 4: The container is not sealed. A loose zip-top bag or a container with a cracked lid leaks air. The humidity inside drifts toward the room humidity. Your test becomes useless.
Use a fresh bag. Double check the seal. Press the air out before sealing.
Mistake 5: Testing at the wrong temperature. The 75% target only holds at room temperature. If you run the test in a hot garage or a cold basement, the reference changes. At 60°F, the salt solution holds closer to 74.5%.
At 90°F, it holds closer to 75.5%. For home use, those differences are small. But if you are testing in extreme conditions, the numbers shift.
Run the test in a climate-controlled room.
Frequently Asked Questions
How long does the salt test take?
The salt test needs at least 6 hours to stabilize. Twelve hours is better. The sensor needs time to reach equilibrium with the air in the container.
Do not rush it. A longer test gives a more reliable reading.
Can I use a Boveda pack instead of salt?
Yes. A Boveda one-step calibration pack holds a specific humidity level, usually 75% or 84%. Place it in a sealed bag with your hygrometer.
Wait the same 6 to 12 hours. The pack is more expensive than salt but simpler. No mixing required.
What if my hygrometer has no calibration screw?
You can still use the device. Just note the offset. If it reads 72% during the salt test, it is 3% low.
Add 3% to every reading. Write the offset on the device with a label. It is not perfect, but it works.
How often should I test my hygrometer?
Test it once a year. Digital sensors drift slowly. Analog sensors drift faster.
If you store valuable items like cigars or instruments, test every six months. Mark your calendar. It is easy to forget.
Does altitude affect the salt test?
Slightly. At very high altitudes, the boiling point of water changes. The salt solution equilibrium shifts a little.
For most home users below 5,000 feet, the difference is negligible. Above that, expect a 1% to 2% variance.
Can I test multiple hygrometers at once?
Yes. Put them all in the same sealed container. The test chamber stabilizes at one humidity level.
You can compare readings side by side. This is the fastest way to find the outlier and confirm which units are accurate.