How to Clean a Dehumidifier
If your dehumidifier is working harder but pulling less water, or you're getting a musty smell every time it runs, you need to know how to clean a dehumidifier the right way. A dirty unit doesn't just perform poorly. It can actually make your indoor air quality worse by breeding mold and bacteria inside the machine.
Per the EPA's indoor air quality guidelines, indoor relative humidity should stay between 30 and 50 percent to prevent mold growth. A dehumidifier that's caked with dust and grime can't maintain that range effectively. That's why regular cleaning isn't just about maintenance.
It's about protecting your home and your health.
Quick Answer
Unplug the unit first. Remove and wash the water bucket with mild soap. Vacuum or wash the air filter.
Gently clean the coils with a soft brush. Clear the drain hose. Let everything dry before reassembly.
Clean filters every two weeks. Clean coils every three months.
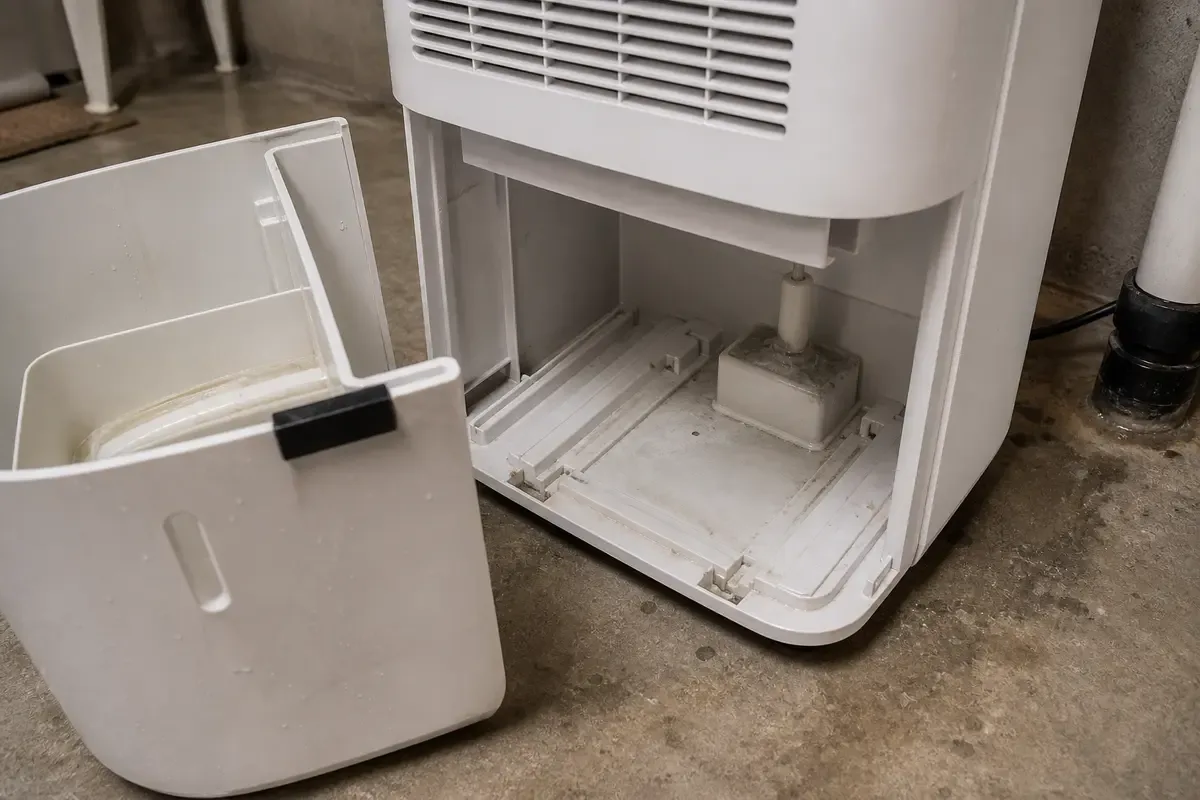
Image source: Bing (Web (fair-use with source credit))
Why a Dirty Dehumidifier Is a Health and Efficiency Problem
Your dehumidifier traps moisture for a living. That makes it a perfect breeding ground for mold, mildew, and bacteria if you don't keep it clean. Even the best dehumidifier will underperform when its internal parts are coated with grime.
Here's what happens when you skip the cleaning routine. The air filter gets clogged with dust and pet dander. Less air flows through the unit.
The compressor has to run longer to pull the same amount of water. That drives up your electricity bill. Meanwhile, the standing water in a dirty bucket becomes a science experiment.
Mold spores float back into your room every time the fan kicks on.
The health angle matters too. The EPA notes that indoor mold exposure can trigger allergy symptoms, asthma attacks, and respiratory irritation. A dehumidifier that's supposed to solve that problem can actually make it worse if the inside is growing its own mold colony.
Aggregate reviews across thousands of dehumidifier owners report that musty smell is the number one complaint. In almost every case, the fix is a thorough cleaning. Not a replacement.
Not a repair. Just a bucket scrub and a filter rinse.
There's also the efficiency hit. The Department of Energy has tested dehumidifiers under dirty versus clean conditions. A unit with a clogged filter uses up to 15 percent more energy to hit the same humidity target.
That's wasted electricity you're paying for every month.
The bottom line is simple. A clean dehumidifier runs cheaper, lasts longer, and keeps your air healthier. A dirty one does the opposite.
Know Your Unit: Filters, Coils, Buckets, and Pumps
Before you start scrubbing, you need to know what's inside your machine. Every dehumidifier has four main areas that collect dirt and grime. They all need different cleaning approaches.
The water bucket. This is the tank where extracted moisture collects. It's usually removable and easy to clean. But the bucket has a hidden part you shouldn't miss.
The float switch sits inside the bucket or near the top. It tells the machine when the bucket is full. If that switch gets sticky from slime, your unit might keep running even when the bucket is full.
Or it might shut off prematurely.
The air filter. Most portable dehumidifiers have a washable foam or mesh filter that slides out from the front or back. Some higher-end units use a disposable HEPA filter that can't be washed. You need to know which type yours has.
Check the manual if you're not sure.
The coils. The evaporator and condenser coils look like a dense row of metal fins. They sit behind the front grille. Dust and lint get trapped between those fins over time.
A thick layer of dust acts like insulation. It keeps the cold coils from pulling moisture out of the air effectively.
The condensate pump and drain hose. If your dehumidifier has a continuous drain option, there's a hose port and potentially a small internal pump. Algae and slime can grow inside the hose and block the flow. The pump inlet can also get clogged with debris.
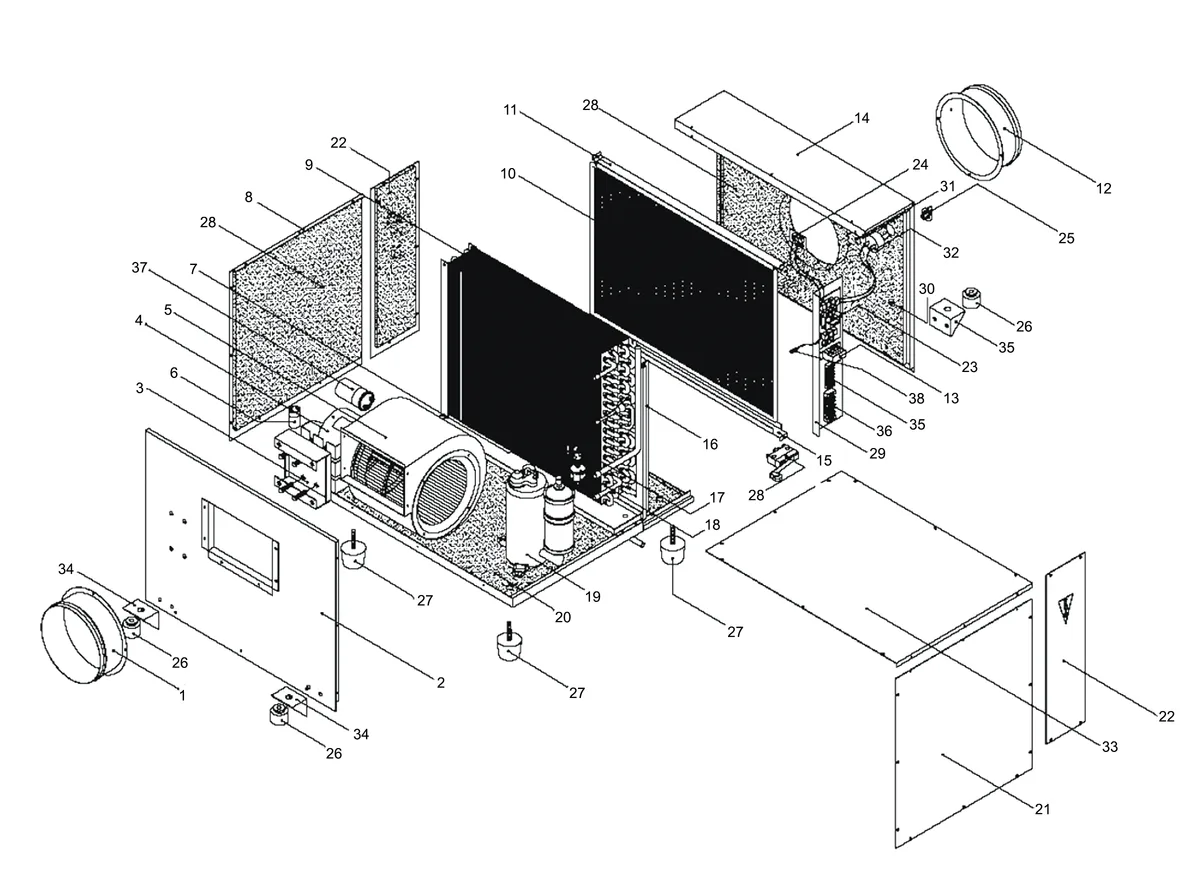
Image source: Bing (Web (fair-use with source credit))
Here's a quick reference for what each part needs:
| Part | Cleaning Method | Frequency |
|---|---|---|
| Water bucket | Wash with mild soap and warm water | Every 1–2 weeks |
| Float switch | Wipe with a damp cloth or cotton swab | Every 1–2 weeks |
| Air filter (washable) | Vacuum or rinse with water | Every 2–4 weeks |
| Air filter (disposable) | Replace with new filter | Every 3–6 months |
| Coils | Vacuum with soft brush attachment | Every 3–6 months |
| Drain hose | Flush with water or vinegar solution | Every 3 months |
| Condensate pump inlet | Clean with a small brush or pipe cleaner | Every 3 months |
Knowing which type of dehumidifier you have also matters. Compressor units are the most common. They work like a refrigerator and use refrigerant to cool the coils.
Desiccant units use a rotating wheel and a heating element. They're less common in homes but popular in cooler climates. The cleaning steps are basically the same for both types.
The main difference is that desiccant units don't have cold coils. So they're less prone to frost buildup.
Dehumidifier Cleaning Safety: Unplug First, Bleach Last
This section is short because the rules are simple. But they're absolutely non-negotiable. A dehumidifier combines water and electricity in one box.
That means you need to be careful every single time you clean it.
Rule one: always unplug the unit. Pull the plug from the wall outlet before you touch anything inside. Don't just turn it off with the power button. Many dehumidifiers have a standby mode that keeps power flowing to the control board.
You want zero current running through the machine while your hands are near water.
Rule two: never submerge the main body. The bucket can go in the sink. The filter can go under the faucet. The main unit with the compressor, motor, and electronics stays dry.
Wipe it down with a slightly damp cloth. Never pour water into the grille or spray it with a hose.
Rule three: be careful with cleaning chemicals. Vinegar is a popular natural cleaner for dehumidifiers. But it's acidic. On some models, vinegar can eat away at the plastic bucket's surface or damage the protective coating on the coils.
Per the EPA's mold cleanup guidance, mild detergent and water is usually sufficient for mold and mildew removal. If you need a disinfectant, a 3 percent hydrogen peroxide solution is safer for plastics than bleach. Bleach can damage plastic components and leave a chemical residue that's hard to rinse fully.
Rule four: follow your warranty. Many manufacturers require specific cleaning procedures to keep the warranty valid. If you use a harsh chemical or damage the coils while scrubbing, you might void the coverage. Check your owner's manual for any cleaning restrictions.
Some brands explicitly warn against using bleach or vinegar.
Rule five: know when to call a professional. If you suspect a refrigerant leak, do not try to repair it yourself. Refrigerant is regulated by the EPA under the Clean Air Act. Handling it requires specialized certification and equipment.
Signs of a leak include the unit running but not cooling, oil spots near the coils, or a chemical smell. That's a job for an HVAC technician.
How to Clean a Dehumidifier Step by Step
Now let's walk through the actual cleaning process. You'll need a few basic supplies. Mild dish soap, a soft cloth or sponge, a soft-bristle brush or toothbrush, a vacuum with a brush attachment, and white vinegar or hydrogen peroxide if you're disinfecting.
Step one: unplug and disassemble. Pull the plug. Remove the water bucket. Take out the air filter.
If your unit has a front grille that snaps off, remove that too so you can access the coils.
Step two: clean the water bucket. Empty any remaining water into a sink or drain. Wash the bucket with warm water and a few drops of mild dish soap. Use a soft sponge to scrub the inside.
Pay special attention to the corners and seams where slime likes to hide. Rinse thoroughly. Dry with a clean towel or let it air dry.
Step three: clean the float switch. While the bucket is out, look for the float switch. It's usually a small plastic piece that moves up and down. Wipe it clean with a damp cloth.
If it's sticky with grime, use a cotton swab dipped in soapy water. Make sure it moves freely. A stuck float switch is one of the most common reasons for dehumidifier malfunctions.
Step four: clean the air filter. Check your manual to see if the filter is washable or disposable. If it's washable, vacuum both sides with the brush attachment first. Then rinse it under running water.
Don't use soap on most filters unless the manufacturer specifically says you can. Squeeze out excess water gently. Never wring or twist the filter.
Let it dry completely before putting it back. A wet filter will grow mold within days.
Step five: clean the coils. This is the most delicate step. The metal fins on the coils are thin and bend easily. Use a vacuum with a soft brush attachment to gently remove dust and lint from the surface.
Work in the direction of the fins. Don't press hard. If there's stubborn grime, use a soft brush or a can of compressed air.
For greasy buildup, you can lightly mist the coils with a solution of water and mild soap. Spray sparingly. Let the coils dry completely before you power the unit back on.
Image source: Bing (Web (fair-use with source credit))
Step six: clear the drain hose. If you use the continuous drain option, disconnect the hose. Flush it with warm water to remove any algae or slime. If the flow is slow, run a solution of equal parts white vinegar and warm water through the hose.
Let it sit for 15 minutes. Then flush again. If your unit has a condensate pump, check the pump inlet for debris.
Use a small brush or pipe cleaner to clear any blockages.
Step seven: wipe down the exterior. Use a damp cloth to clean the outside of the unit. Pay attention to the air intake grille and the control panel. Dry everything with a clean cloth.
Step eight: reassemble and test. Make sure the filter is completely dry before you put it back. Reinstall the bucket, filter, and any grille panels. Plug the unit back in.
Run it for a few hours. Check that it's pulling water normally. Listen for unusual noises that might indicate something wasn't reassembled correctly.
Dehumidifier Cleaning Mistakes That Cost Money and Void Warranties
The most common mistake is rushing. People want to get the job done fast. So they skip the drying step.
They put a wet filter back in the unit. They reassemble the bucket while it's still damp. That trapped moisture becomes a mold factory inside the machine.
Within a week, that musty smell is back worse than before.
Another big mistake is using harsh chemicals. Bleach is the worst offender. It can damage the plastic bucket, the rubber seals, and the float switch.
It also leaves a strong chemical residue that's hard to rinse completely. That residue can get into the air when the dehumidifier runs. Hydrogen peroxide is a better choice if you need to disinfect.
But even then, rinse thoroughly.
Scrubbing the coils too hard is another common error. Those metal fins are fragile. If you bend them over, the airflow gets restricted.
That kills the unit's efficiency. If you do accidentally bend some fins, you can straighten them carefully with a fin comb. But it's better to be gentle in the first place.
Some people also forget to clean the float switch. They wash the bucket and think they're done. Then the unit either overflows or shuts off randomly.
The float switch is a small part that's easy to overlook. But it causes a lot of frustration.
Using the wrong type of filter is another issue. If your unit has a disposable HEPA filter, don't try to wash it. Washing destroys the filtration media.
You'll get worse air quality and less airflow. Replace disposable filters on schedule instead.
And finally, some people skip the drain hose entirely. They clean everything else but never flush the hose. Over time, algae builds up inside.
The hose gets clogged. Water backs up into the unit. That can cause the bucket to overflow or the pump to fail.
A quick flush every few months prevents that whole problem.
How Often to Clean Your Dehumidifier: A Realistic Maintenance Schedule
Cleaning frequency depends on how much you use the unit and where you live. A dehumidifier running 24/7 in a humid basement needs more frequent cleaning than a seasonal unit in a dry climate.
Daily. Empty the water bucket if it's full. This prevents standing water from growing mold. It also keeps the unit running efficiently.
Weekly. Wipe down the bucket with a dry cloth. Check for any visible slime or debris. If you notice any buildup, do a full wash right away.
Every two weeks. Wash the water bucket with mild soap and warm water. Clean the float switch. This is the minimum schedule for units in heavy use.
Every month. Clean or replace the air filter. A clogged filter is the single biggest cause of poor performance. This step alone can restore your unit's efficiency.
Every three months. Clean the coils. Flush the drain hose. Check the condensate pump if your unit has one.
This deeper cleaning prevents the buildup that causes musty smells and reduced performance.
Seasonally. Give your unit a full deep clean before storing it for the off-season. Let all parts dry completely. Store the unit in a dry, dust-free area.
If you live in a climate with distinct seasons, do another deep clean before pulling it out for summer use.
Pro tip. Mark your calendar with reminders. Set a recurring reminder on your phone for each task. The easiest way to remember is to pair cleaning tasks with a regular habit.
Wash the filter when you pay your electric bill. Clean the coils when you change your HVAC filter.
When Cleaning Isn't Enough: Repair, Replace, or Call a Pro
Sometimes a deep clean doesn't fix the problem. Here's how to know when it's time to call a professional or buy a new unit.
The unit runs but doesn't pull water. If the fan is running and the compressor is humming, but the bucket stays dry, you might have a refrigerant leak. This requires a certified HVAC technician. Don't try to fix it yourself.
The unit is making strange noises. A rattling sound could mean something is loose. A grinding sound could mean the compressor is failing. If cleaning doesn't stop the noise, call a professional.
Compressor repairs are often expensive. It might be cheaper to replace the unit.
The unit is leaking water. Check the bucket and drain hose first. If those are clean and properly seated, the leak could be from a cracked bucket or a failed seal. Replacement parts are sometimes available.
But for older units, replacing the whole dehumidifier is usually more cost-effective.
The unit smells even after cleaning. If you've done a thorough cleaning and the smell persists, there might be mold inside the unit's insulation or behind the coils. This is hard to reach. Some manufacturers offer a warranty for such issues.
Otherwise, it's time to shop for a new unit.
The unit is more than five years old. The average lifespan of a portable dehumidifier is three to five years. If yours is older and has a problem, replacement is usually the better option. Newer models are more energy efficient.
They might also have better features like auto-drain or built-in pumps.
The cost of repair is more than half the price of a new unit. This is a simple rule of thumb. If the repair estimate is over 50 percent of the cost of a similar new unit, replace it. You'll get a fresh warranty and better efficiency.
Frequently Asked Questions
Can I use bleach in my dehumidifier?
No. Bleach can damage the plastic bucket, rubber seals, and float switch. It also leaves a chemical residue that's hard to rinse.
Use mild dish soap for regular cleaning. Use hydrogen peroxide if you need to disinfect.
Why does my dehumidifier still smell after cleaning?
You probably missed a part. The most common culprits are the float switch, the drain hose, and the condensate pump. Also check inside the bucket's handle and seams.
If the smell persists, there might be mold inside the unit's insulation. That's hard to reach and may require a replacement.
How do I get mildew out of the dehumidifier bucket?
Wash the bucket with warm water and mild dish soap. Scrub the corners and seams with a soft sponge. Rinse thoroughly.
If the mildew smell remains, fill the bucket with a solution of equal parts water and white vinegar. Let it soak for 30 minutes. Rinse and dry completely.
Is cleaning the coils really necessary every few months?
Yes. Dust and lint build up on the coils over time. That layer of dust acts as insulation.
It prevents the coils from getting cold enough to pull moisture from the air. Dirty coils make your unit work harder and use more electricity. A quick vacuum every three months solves this.
How do I know if my filter is washable or disposable?
Check your owner's manual. Washable filters are usually made of foam or mesh. They slide out easily and can be rinsed under water.
Disposable filters are often made of paper or fiberglass. They cannot be washed and must be replaced. If you're not sure, look up your model number online.
Can I use a pressure washer to clean the coils?
No. Pressure washers are too powerful. They will bend the delicate metal fins and force water into the electrical components.
Use a vacuum with a soft brush attachment or a can of compressed air. Gentle is always better.